Tag:

Pizza

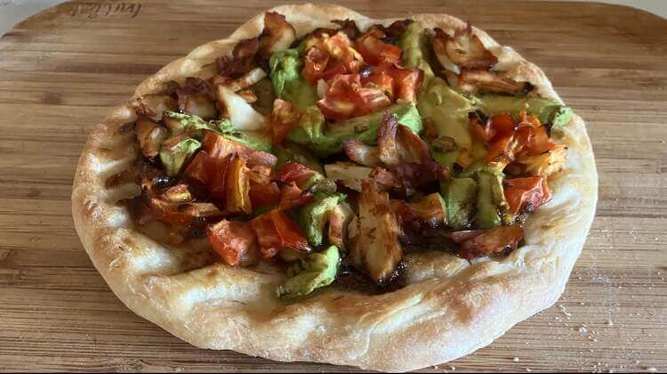
While I’ve been at it watching endless Domino pizza making POV clips on YouTube lately, I’ve had the chance to make another pizza of my own entirely from scratch that is homemade in none other than deep pan pizza for lunch – the one that I used to enjoy eating those from both Pizza Hut & Dominos. 

Every now and then we have days when we go with a day without meat as thought this would be a great time to make one without meat of course as still eat meat outside of a certain meat-free day for the most part & yet this deep pan pizza I’ve made both tastes and also looks good at the same time. 

The ingredients I had on it was tomato sauce mixed with oregano and a bit of white pepper alongside avocado, tomatoes and some pineapple as still on the lookout for some dairy-free cheese and also meat-free sausage someday that doesn’t have soybeans, black beans and pine nuts on it to avoid eczema. I’ll let you know I’m able to find one or a few that can help improve my pizza making even better of any kind without any problems.
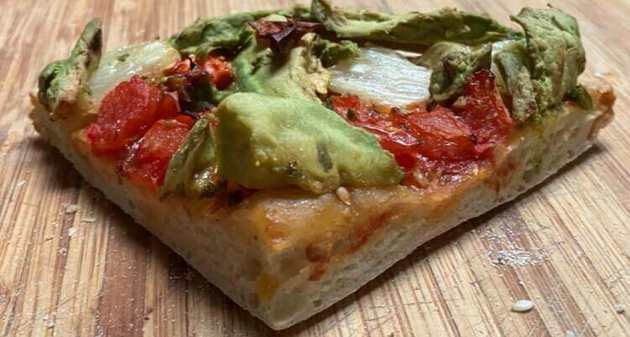
Every time though when you make pizza dough with yeast and then wait it out to rise for 1-2 hours, make sure you don’t thin out your base too much. 

Yes, I’m all for it also with thin n’ crispy pizza as done that a few times before as also loved eating that too; But again, make sure leave 1-2 inches out depending on the volume you put in with your yeast by not stretching it too thin. 

Otherwise, it will come out a bit like a volcano/part basketball shaped like pizza – at least after cooking the bottom part based from experience. 

Although I had to collapse it after cooking the top part which then looks like a normal flat shaped pizza as if I was a chiropractor, but then it’s best to keep it with a rule of thumb as said above for next time.

With deep dish pizza dough, you might want to keep it a bit longer when it comes to the cooking process, and that includes both the bottom first and then the top sides with the saucing and other toppings of your choice. 

Patience is key but boy, the pizza looks stunning hands down. It’s easy for me to manage with making pizza (as long as you keep a good rule of thumb with how you want to shape your pizza base) whenever & wherever I like from time to time.

0 comment
0 FacebookTwitterPinterestEmail

Here’s an air-fryer pizza recipe that you can make at home by starting off with 2 x 1/8 teaspoons or simply 1 x 1/4 teaspoon of nutritional yeast as well as close to 1/4 cup of warm water & 1/4 teaspoons of sugar onto a bowl. Make sure you mix them well before cover the yeast for a while between 30 mins-1 hour,

Then add 1/2 cup of flour (and continue to add a few teaspoons to it as long as it’s no longer sticky), 1/2 teaspoons of oil and some salt on top of the activated yeast by kneading it for a few minutes before you coat the pizza dough with another few drops of oil and cover it again up to one hour in order for this to rise.

That’s the simpler way to begin with if you’re not sure for beginners as found another method to make the pizza base without using another separate bowl. All you have to do is apply the same yeast method as above before you add the required wet and dry ingredients combined to make up one good looking pizza dough & again, just wait for this to rest & rise for a while.

After the dough has doubled in size for a little over an hour or two, you can shape the dough up using your hands and/or rolling pin to fit around the pizza tray size of your choice at home including the circle edges with some more sprinkles of flour.

Now it’s time for the cooking process to begin and in order for the pizza crust to taste really good on both sides is you first cook the bottom part without any sauce and toppings alongside some oil at 185-190 degrees celsius for the first ten minutes in order to make things crispy. Then flip it over by adding whichever sauce and toppings you like (which will take a while) before coating a bit of oil back onto the air fryer for another ten minutes. You can see some crispiness on both sides of the crust including the middle when cut with all those yeasty stuff once the pizza comes out of the air fryer!

And that is it after letting the pizza cool for a while before it’s ready to eat! This is what makes homemade pizza recipes look so good, having done more than few times now, You can have it for lunch and if you want to have another pizza the next day, cut the dough in half before you save it into the fridge by covering it up with a plastic wrap. When you’re ready, repeat the above same ready dough prep/air fryer process & your pizza will still be good to eat without having to order one elsewhere!!

0 comment
0 FacebookTwitterPinterestEmail

Here’s another dairy-free snack or topping you should try at home which is the Bio Cheese Cheedar flavour slices that I’ve brought off my local supermarket at Woolworths yesterday. Although it doesn’t have a health star rating, but it’s still healthy to eat with plenty of benefits being shown there. I’ve shredded one slice across two small pizzas earlier today during lunch and they taste really good, especially when it’s so perfect for those who are on a meat-free/vegan diet.

I could’ve also brought the ready-made shredded version as far I’m aware of, but you pair up see the dairy-free sliced pack beyond pizzas such as burgers/wraps/sandwiches, as well as biscuits, pasta, garlic bread & many more of your choice.

In terms of price, it can be a bit expensive at around the $6 mark but it’s still worth the weekly eating budget when looking to keep healthy or stay away from dairy. See it for yourself & make dairy-free cheese your own regular lunch or snack craving.

0 comment
0 FacebookTwitterPinterestEmail

Normally, you would usually put the toppings first on top of the pizza base that is covered with pizza sauce before putting onto the pre-heated oven/air fryer for 10 or so minutes. This is usually suitable for frozen ready-made pizzas off the supermarket shelves & re-heated pizzas for slightly less cooking time before eating.

However, I experimented putting a blank pizza base for the first seven yesterday afternoon, then flip the other side by putting the sauce & toppings on top of the base afterwards. Make sure you put it back onto your electrical appliance for another 3-4 minutes so the breading/crust can be nice & crispy once it’s ready to eat.

And when I got to taste it, it did pay off well on both sides. If I can improve one thing to make the pizza base even better, I would say cook them both sides by rotating the base without topping and sauce through five minute intervals. Then add your favourite sauce & toppings to put back onto the oven/air fryer for another 3-4 minutes & not only the crust looks delicious as always, but also the inside as well when cutting them into slices. As said, it would not hurt to try if you only have a homemade or frozen blank pizza base.

0 comment
0 FacebookTwitterPinterestEmail

Here’s a delicious chicken & tomato pizza that you can enjoy healthily for lunch or as an afternoon snack.

The following ingredients you need are:

  • Some sliced chicken by cutting it into squares
  • A few drops of Pizza Sauce & then spread them through over the base (although not all of it as leave 1-2 inch around the edges of the crust).
  • Two small frozen Pizza bases
  • Some small/cherry tomatoes
  • Some chopped spring onion

All you have to is prepare these ingredients before you warm up your air fryer or oven at 180 degrees celsius for about five minutes. 

Then place your pizza there for 9-10 minutes at the same temperature (although you may have to cook it again for the second small pizza onto an air fryer since they only fit in one base) & it’s good to eat once they’re ready.

It’s up to you how you like your delicious & healthy pizza, even some avocado and/or green veggies on top of these usual ingredients above isn’t a bad option alongside some air fried chips as a side meal.

See it for yourself as I hope you enjoyed this quick minute lunch recipe at home without having to spend some money & eat out a lot elsewhere.

0 comment
0 FacebookTwitterPinterestEmail

I had a chance to taste these small pizza bases the other day thanks to Nevana and they taste really good once it’s out of the oven/air fryer.

To get the best out of these pizza breads (as long as you got your pizza sauce & toppings on beforehand), make sure you pre-heat your oven or air fryer first at 180-185 degrees Celsius for 5-6 minutes before you place your pizza base for 8-10 minutes. Then cool your pizza down for another few minutes before it’s ready to eat which is going to taste amazing. Here’s a Hawaiian pizza I made earlier today ahead of lunch with some shredded ham, some pineapple and tomato pizza sauce.

Although they do have a best before date on the price tag clip, but according to the packaging, they will last for one year as long as you keep them frozen in the refrigerator. Plus, they’re locally made from South Australia since 1982.

You can go & buy these small Nevana pizza bases which comes in 12 pack at a supermarket near you for $4.80 at Coles & Woolworths.

0 comment
0 FacebookTwitterPinterestEmail